Common problems in 3d printed jewelry casting include: resin residue, shrinkage, layer lines, support structure artifacts, hollowing issues, and material-specific flaws. Each of these 3D printing jewelry casting defects can turn intricate designs into problematic casts, with issues ranging from uneven surfaces caused by layer lines to structural instability from poor hollowing techniques. Tackling these 3D printed jewelry issues requires a balance of precision, material knowledge, and smart troubleshooting to ensure your designs shine through without imperfections.
Resin Residue Issues In 3d Printed Jewelry
3D printed jewelry casting problems often arise from resin residue issues. Uncured resin residue present on or within 3D printed parts can lead to gas formation during the burnout process. This can result in porosity or incomplete casting, and even minimal amounts of residue can compromise the overall casting quality.
There are 3 major causes for this problem:
- Incomplete cleaning of printed parts
- Inadequate post-curing of the resin
- The use of incompatible cleaning solutions
Common signs of resin residue can be identified through various indicators such as sticky or tacky surfaces, the presence of a white residue after alcohol cleaning, uneven surface shine, a strong resin odor after drying, and discrepancies in weight between parts.
Establishing a cleaning protocol utilizing compatible solvents is a solution to this problem. Adhering to the resin manufacturer’s post-curing specifications is also essential. Employing ultrasonic cleaning can greatly enhance the removal of residue, ensuring that the cleaning solutions used are compatible with the resin.
A detailed cleaning protocol should begin with an initial rinse using 91% or higher isopropyl alcohol (IPA). Following this, the part should be submerged in an ultrasonic bath for three to five minutes. After this step, a second IPA rinse should be performed to eliminate any residual contaminants. Finally, forced air drying should be used, followed by UV post-curing of the part under controlled temperature conditions to complete the cleaning process.
In this blog post, there is a complete list of what is needed for washing jewelry models.
Shrinkage Issue in Jewelry 3d Resin Printing
Shrinkage is a major concern in the world of resin 3D printing, especially when it comes to jewelry casting, where precision and intricate details are paramount. If shrinkage is not managed effectively, it can lead to discrepancies in size, weight, and detail, ultimately compromising the quality of the final cast.
This video describes shrinkage and shows how testing and iteration can improve the final jewelry result.
-
- Polymerization Shrinkage: During polymerization, as the resin hardens, the molecular structure undergoes changes that result in a decrease in volume.
- Post-Printing Shrinkage: After the printing is complete, cooling can cause additional shrinkage, particularly in the thicker sections of the print.
- Alcohol Washing: Immersing the resin in alcohol can help clean it, this step can cause the resin to swell. As it dries, it may contract unevenly, creating further inconsistencies.
- Continuous Shrinkage: Some resins exhibit continuous shrinkage over time if they are not post-cured or cast promptly.
- Profile Limitations: Entry-level printers often come with limitations that hinder their ability to compensate for these issues. Without advanced tools for scaling and offsets, these printers may produce models that are more susceptible to dimensional inaccuracies, making it even more challenging to achieve the desired results.
Managing shrinkage in 3D printing requires careful attention to materials, design, and printer capabilities. Use low-shrinkage, jewelry-grade resins to ensure precision, and avoid resins prone to continuous shrinkage unless cast immediately after printing.
Consistent wall thickness is key to minimizing stress and deformation, while shrinkage compensation in slicing software, like scaling and offset adjustments, helps account for material behavior. Entry-level printers may require manual size adjustments for known shrinkage rates, while professional printers offer advanced scaling and offset options for better accuracy.
Post-processing plays a vital role. Limit alcohol immersion time, dry models with compressed air, and use controlled UV curing to stabilize dimensions. Testing and iteration are essential—test prints with varying thicknesses and measure deviations using a micrometer to refine your settings for consistent results.
Layer Lines and Stepping
Layer lines or visible ridges are another 3d jewelry casting issue. If these lines are not addressed before casting, they can transfer to the final piece, necessitating additional finishing work afterward.
Layer lines can be attributed to several factors in the 3D printing process:
- Print resolution: if the resolution is insufficient, it results in thicker layers that are less precise, making the lines more pronounced.
- The orientation of the print: certain angles can create larger visible cross-sections, particularly on flat or horizontal surfaces
- The thickness of the layers: Thicker layers tend to sacrifice detail, leading to more noticeable stepping.
- Interruptions during the printing process: pauses, can cause resin shrinkage, leaving behind visible marks.
- Overheating the resin: leads to overflow, creating irregularities between layers.
- An unlevel build plate or having a wobbly Z-axis: results in uneven layer bonding.
- Exposure time: Underexposed layers may not bond properly, while overexposed base layers can become too rigid, leading to delamination.
- Lift speed: the speed at which layers are lifted can affect how well they settle before the next layer is applied, contributing to uneven stacking.
- Model Orientation: Large cross-sections or rapid transitions between small and large cross-sections can exacerbate layer line visibility due to uneven resin flow or curing.
To troubleshoot these layer line issues effectively, start by adjusting the printing temperature. The temperature should follow the manufacturer’s guidelines. It’s important to stay within the recommended range. Within this range, adjustments can be made to find the ideal setting. The goal is to prevent overflow and ensure proper layer adhesion.
Checking the alignment of the build plate is also vital; ensuring it is level and free from wobble can significantly improve layer bonding.
Exposure times should be fine-tuned as well. Increasing the exposure time for under-cured layers can enhance bonding, while decreasing it for overly rigid bottom layers can prevent brittleness. Adjusting the lift speed and allowing adequate wait time between lifts can help each layer settle properly before the next one is applied. Strategically orienting the model can also minimize the cross-section of each layer, which reduces stress and improves uniformity.
And last, to prevent visible lines there are considerations for print settings. The below table shows this information:
| Aspect | Details |
| Layer Heights and Detail | 10-25 microns: For intricate, high-detail jewelry designs. |
| 25-50 microns: Balanced quality and speed for most jewelry applications. | |
| 50-100 microns: Faster prints or prototypes with less detail. | |
| Speed vs. Precision | Lower layer heights: Improve detail but significantly increase print time. |
| Higher layer heights: Speed up printing but reduce surface quality. | |
| Printer and Resin Limitations | Resin viscosity and hardware typically limit layer heights to 10-100 microns. |
| Most resin slicers default to 50 microns for balanced results. | |
| Customization | Adjust layer height based on project requirements. |
| Use lower heights for intricate designs and higher heights for simpler models to save time. | |
| Resin-Specific Settings | Adjust UV intensity or enable anti-aliasing features, if available. |
Additional tips to achieve a smooth surface:
This video shows a hack to eliminate layer lines:
We also recommend these tips to have a smooth surface:
Post-processing is vital for smooth and defect-free resin prints. Start by cleaning with two IPA baths and soft brushes to remove uncured resin, followed by UV curing at 35-40°C for 5-15 minutes.
Enhance surfaces with thin resin spray coatings, resin dipping, or precision sanding (600-2000 grit) for layer lines and support marks. Micro-polishing can create a mirror finish on curved surfaces.
Ultra-fine layers (10-25 microns) need minimal post-processing, while standard layers (25-50 microns) benefit from coating and extra attention to horizontal surfaces. Advanced methods like vacuum or heat treatment improve coating quality for intricate designs.
Support Structure Artifacts
Support structures are related to jewelry printing defects. While these supports are necessary for maintaining stability during the printing process, if they are not designed, placed, or removed correctly, they can leave unsightly marks on the surface of the final jewelry piece. To achieve high-quality jewelry, it’s important to have a solid understanding of how to effectively place and remove these supports.
These kinds of jewelry printing defects are usually caused by:
- Improper support removal can damage delicate features or leave visible marks.
- Over-supporting areas increase the risk of excess material leaving unwanted artifacts.
- Poor placement, especially in visible or critical areas, leads to surface imperfections on the final cast.
But what is the solution? First, before starting the printing process, it’s important to thoroughly analyze the design’s geometry to pinpoint critical areas that will need support. Adjusting support settings, such as density, patterns, and interface layers, to match the specific design and material can make a significant difference in the final result. Testing different layer heights and resolutions can also help reduce visible support artifacts on the finished piece.
To ensure smooth support removal and surface quality, you can perform a “Smurf test,” which evaluates how easily supports can be detached and how smooth the surface looks afterward. When removing supports, use precise tools and follow a consistent method to minimize the risk of damage. Keep in mind the temperature of the part during removal, as improper handling can lead to warping. Once the supports are removed, finish the contact points with gentle surface treatments like sanding or polishing to create a smooth and flawless appearance.
Additional tips to remove supports carefully:
Thoughtful model orientation, such as tilting earrings at a 45-degree angle, helps reduce visible support marks and minimizes the need for excessive support.
Heavier supports can improve stability but may add extra finishing work.
For specific designs, rings benefit from a raft, thick central support, thinner surrounding supports, and small edge supports. Pendants require strong central support with additional side supports, while earrings need back and vertical supports for stability.
Striking the right balance in support density ensures stability during printing without creating unnecessary post-processing challenges.
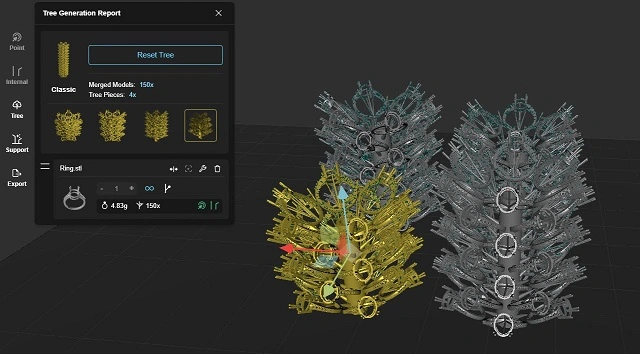
Modern Solutions for Support Structure Optimization
Support structures are crucial for maintaining model stability during 3D printing, but they often risk leaving marks that affect casting quality. JewelsPrint addresses these challenges through advanced tree design, creating self-supporting casting trees with optimized sprue angles between 15-25 degrees from the main trunk. This reduces the need for additional supports and, when necessary, places them strategically across the entire tree structure rather than on individual pieces. By minimizing support connection points and ensuring easy removal, JewelsPrint enhances surface quality while reducing the time and labor required for post-processing. This optimized approach not only preserves fine details but also streamlines the casting workflow.
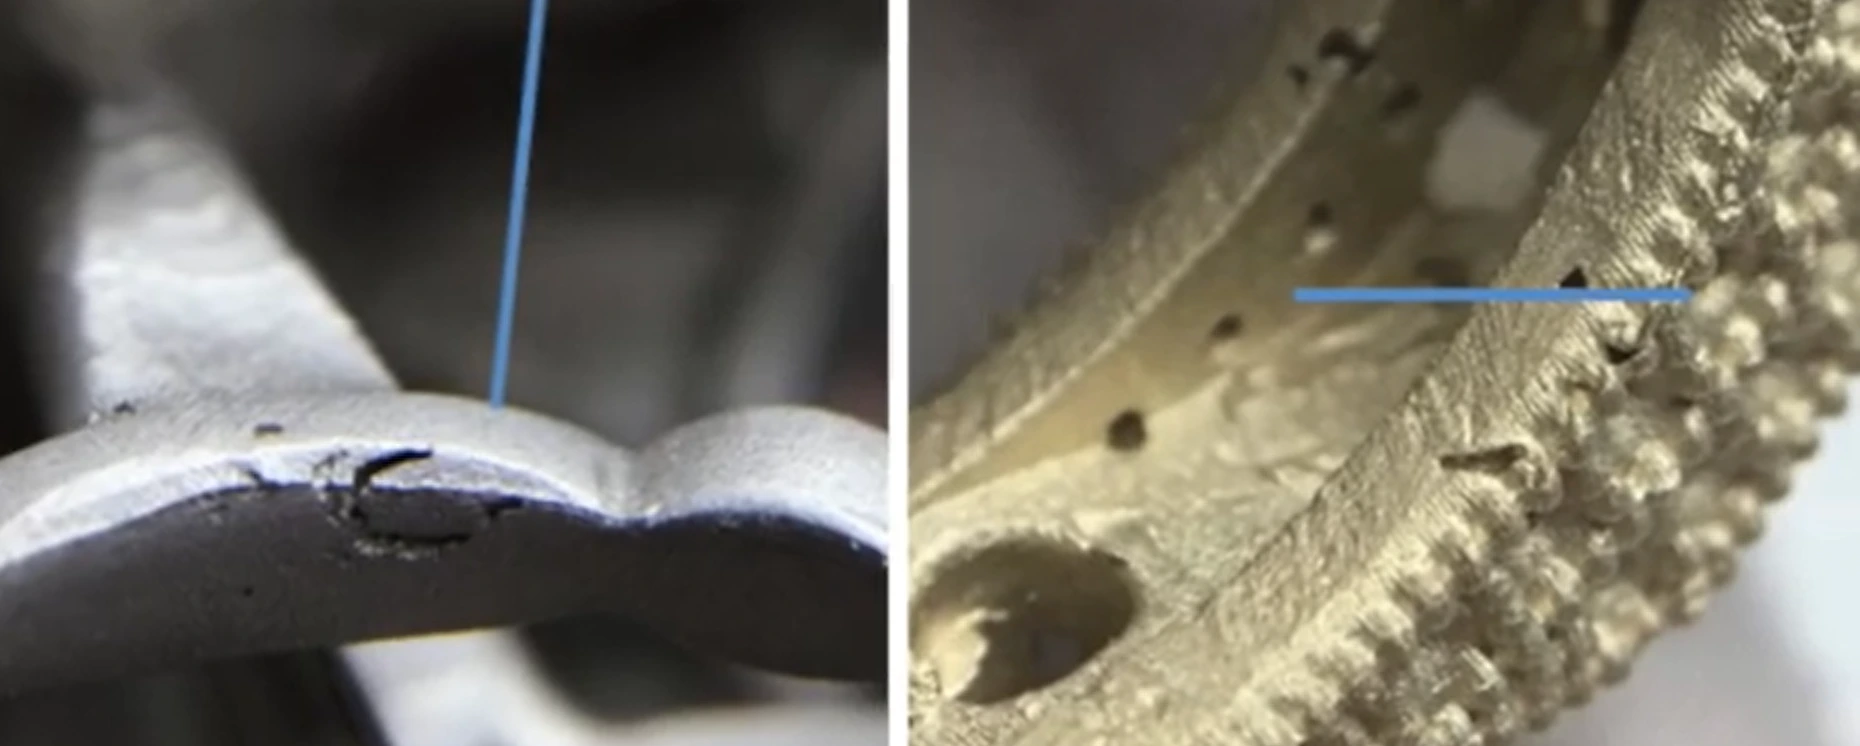
Hollowing-Related Issues
Hollowing is a crucial technique in 3d printing jewelry making, as it helps minimize material usage while improving the efficiency of the casting process. However, it demands meticulous planning and execution to prevent issues such as structural instability and drainage problems. When hollowing is not executed properly, it can cause significant jewelry printing defects, highlighting the importance of careful design and preparation.
- Insufficient or poorly positioned drain holes: When drain holes are not strategically placed, a liquid resin or investment material can become trapped, leading to internal flaws.
- Inconsistencies in wall thickness: if the walls are too thin or uneven, they may compromise the structure’s integrity, resulting in collapses during the burnout or casting stages.
- Trapped materials: If resin or investment material gets stuck in hollow sections, it can create internal stress or result in incomplete burnout.
- Resin Gas Build-Up: if residual resin remains inside the model, it may release gas during the burnout process, causing increased pressure that can lead to cracks or blowouts.
- Obstructed Spaces: Improperly positioned support structures can also obstruct spaces within the hollow areas, which can hinder drainage and airflow. This obstruction can ultimately trap materials or prevent the thorough removal of resin.
Successful jewelry printing requires careful planning and attention to detail. Models should have at least two 2-3mm drain holes at their lowest points to allow proper airflow and resin drainage. Consistent wall thickness between 1 and 4mm is crucial, with thinner walls for small models and thicker walls for larger, intricate designs to reduce shrinkage and improve structural integrity.
Proper model orientation improves drainage and prevents resin buildup in hollow areas. Ensuring the build plate is level, using a paper guide if needed, avoids blocked spaces. Support structures should be placed carefully to avoid obstructing airflow or drainage. After printing, all residual resin must be thoroughly drained and cleaned from hollow spaces before moving to investment.
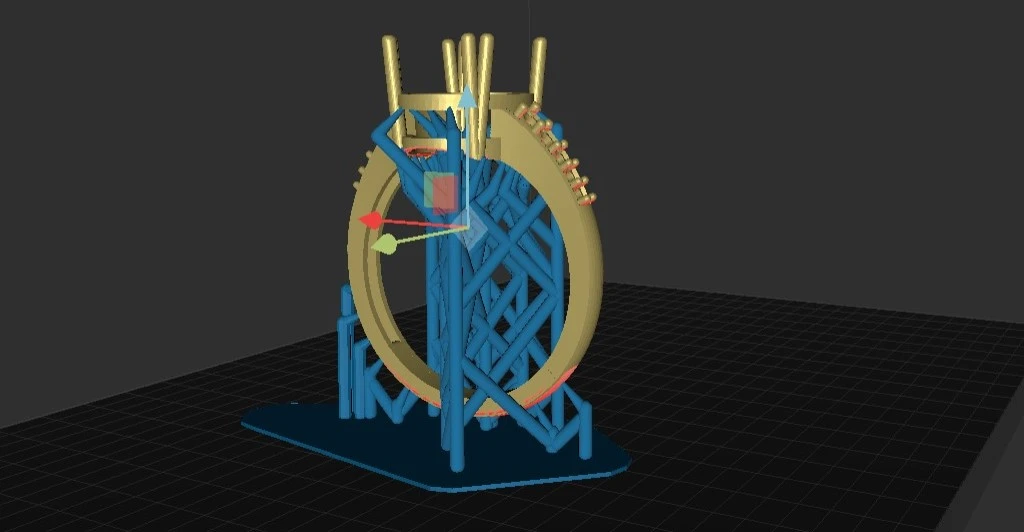
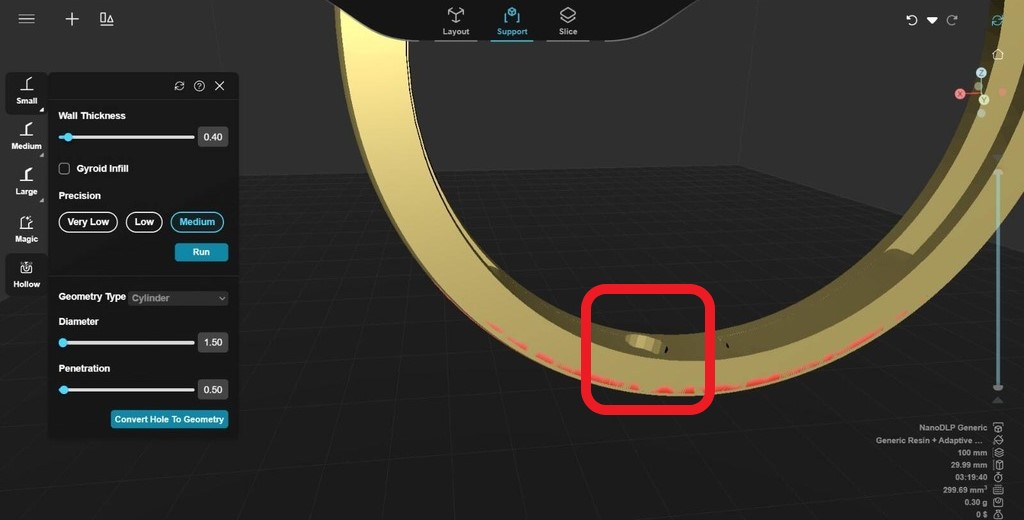
This photo was taken from the NanoSupport tool interface. In this image, one of the hollow points on the underside of the ring can be seen.
Material-Specific Considerations
Some 3d printing jewelry flaws are associated with the materials used. Resin and wax are common materials that most 3D jewelry printers work with. Each of these materials can cause specific issues, each requiring its solution.
Wax-Specific Issues
All information related to this issue is wrapped in the below table:
| Issue | Cause | Solution |
| Surface Discoloration | Impurities in wax or lack of proper airflow | Use high-purity wax and ensure adequate workspace ventilation |
| Ash Residue | Lower-quality wax or improper burnout cycles | Choose low-ash waxes and maintain consistent burnout cycles |
| Warping/Deformation | Improper storage conditions | Store wax models in a cool, stable environment |
| Surface Imperfections | Dust or oils from handling | Handle wax models with gloves to protect surfaces |
| Thin/Delicate Areas | Weak structural support during the process | Reinforce with support structures and sprues to improve metal flow |
Resin-Specific Issues:
There are 3 main aspects related to this issue. Considering these aspects during resin jewelry 3d printing may help to have complete prints.
| Issue | Cause | solution |
| Surface defects from ash | High ash content left after burnout | Use jewelry-grade low-ash resins. Follow manufacturer-recommended burnout cycles. Add wax vents to casting trees and blow low-pressure air into the main sprue opening to remove residual ash |
| Investment instability | Material expansion during burnout | Adjust burnout profiles to match the thermal properties of materials. Ensure sufficient oxygen levels and use venting systems to improve airflow and burnout efficiency. |
| Incomplete resin removal | Lack of tailored burnout cycles and ventilation | Follow customized temperature profiles with proper ventilation. Use venting solutions to optimize oxygen flow and ensure thorough combustion of residual material. |